


New
 🔥 3")
 🔥 4")
 🔥 5")
 🔥 6")
 🔥 7")
 🔥 8")
 🔥 9")
 🔥 10")
 🔥 11")
 🔥 12")
 🔥 13")
Original price was: $6.99.$4.89Current price is: $4.89.
- fast shipping
- Safe Payments, Secure Personal Information
- Nature-friendly materials, 100%.
- 7 days free returns

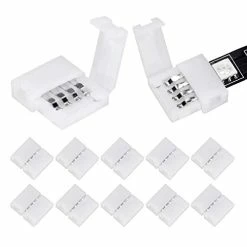
- Color: 10pack 4pin Rgb Connector
- Shape: Round
- Material: Plastic
- Light Source Type: LED
- Shade Material: Plastic
- ❤Solderless couplers for 10mm waterproof RGB LED strips only Pins pierce the strip from behind to make a connection without compromising the silicone Suitable for standard density strips only .
- ❤Quick Splitter Connection and A Solderless Quick Snap Down Solution.These are designed specifically for use with waterproof strips that have a silicone coating.
- ❤Pins of led strip:4 pin Led strip .width:10mm Working Tempreture:0-50°C Storage temp: -20~60°C
- ❤Product Guarantee We offer a 12MONTHS return policy and a one year warranty. Buy with confidence!
8 reviews for Brand new 🔥 WENHSIN 10Packs 4-Pin RGB LED Light Strip Connectors 10mm Unwired Gapless Solderless Adapter Terminal Extension For SMD 5050 Multicolor LED Strip (10Pack 4PIN RGB Connector) 🔥
Add a review
Related products
New
Original price was: $132.74.$82.00Current price is: $82.00.
New
Original price was: $23.99.$16.79Current price is: $16.79.
New

Original price was: $35.99.$25.19Current price is: $25.19.
New

Original price was: $119.19.$81.00Current price is: $81.00.
New

Original price was: $89.99.$62.99Current price is: $62.99.
New
Original price was: $64.98.$45.49Current price is: $45.49.
New
Original price was: $69.99.$48.99Current price is: $48.99.
New
Original price was: $29.99.$20.99Current price is: $20.99.
BirdNerd –
These things are awesome! My kid’s ceiling is 52 feet. *Thought* it was 48ft. So I Bought 50 ft of LED. It came in two 25.something ft strips(10mm)… Plus they had a few extra inches on each set, so I figured it would be perfect and I could just cut off any excess.The plug allows both sets to connect to the same power supply. You hang them in opposite directions and pray they come together.Hid the plug nicely behind the door. Hung the first strip and quickly realized my measurements were wrong because it definitely did not cover half of the room. LolRe-measured and realized I was actually going to need to use these little connectors, and also use a little bit off of my small set of 16ft of LED lights. They are 8mm though. ?Cutting off the prongs to the second set of 25ft strip to connect this was nerve-wracking. I needed to cut it off so the second strip of lights wouldn’t be upside down at the connector. Connector worked! I had already hung the first strip so the adhesive paper was already removed. Took several minutes to get the end under the prongs. I had to use the end of a pushpin to ever-so-slightly lift the metal plates in order to slide the strip underneath. I then used the point of the tack to push them back down. That was a pain up at the ceiling, but doable.The other side still had the paper backing and took 4 seconds to connect. (Once they are connected just lift away the paper backing from the second set and cut through with scissors so you can continue to peel and stick in increments as usual.)Also note: the lights on the second set were possessed and not matching *until* they were straightened out back into a straight line. It seemed like the connection was bad and only worked if I squeezed the connector tighter, so I was getting nervous. I kept making sure the metal clasp were pushed down onto the copper, but as soon as I released the pressure, it would stop working correctly. Tried just holding it up straight where it would be hung and Wa-la! The second set up the color synchronized with the first strip. It just needed to be in a straight line to fix itself.Finished hanging the second set and sure enough I was 2 feet short.I could’ve just hung the 3rd smaller set of 8mm lights into the units power supply since the second connector was still free(it worked, I checked) and then cut off the rest, but then that set wouldn’t have the power supply prongs any longer.I didn’t want to ruin that, so again I used another connector and just cut a couple of feet off the end of the 3rd set. Even though I used this to connect a 10mm set to the 8mm set, it still worked flawlessly.Now I still have an extra strip of 14ft of LED lights intact and the power supply to go with it to use elsewhere. Also note: I didn’t have to scratch off the ends of the strips before sliding it into this connecter because my strip connections were already copper. Apparently some sets are covered with silver that need to be scraped off to reveal the copper.These connectors are basically mandatory! There’s no way I was going to have power supply boxes and extension cords hanging down every 16 or even 25 feet. So ugly. Also necessary unless I wanted one of the two sets from the 50ft box to be upside down. It’s just the way they are made. Not sure why they don’t offer lights with the prongs on the opposite end of one set since they have to start at the same power point and be hung in opposite directions but these connectors saved the day!Would recommend and buy again.
Maya/Fizz –
The media could not be loaded. At first I was skeptical about buying this. I read mixed reviews about it being perfect and amazing and some saying it had some flaws. One of the main problems I saw was the LED strip lighting up but being a different color then the other strip. I experienced this problem as well but I figured out some solutions so that it would work in no time!1. The LED might not be all the way in the connector. The prongs shouldn’t just lightly touch the strip, the prongs should be at the end of the copper part.2. The strip might not be touching the copper evenly. That’s why you might be getting one colors to work and others not. Try to push it in more and make the prongs even on the strip.3. You might be putting the other LED upside down. What I mean by that is that you have to A-line the one LED by the same order of the other. There should be little letters that say grb or some order like that. You want to make the other strip have that same order. If you don’t not only will it make it a different color but it will also make it dim.For anyone who is attaching these on already mounted LEDs, I would suggest attaching a piece of paper to the sticky side where your attaching the clamps so you can stick it in. It might not stick in all the way and its fine but it will get it far enough to where it works.Other then those problems it works great! Haven’t had a problem yet and they really work well. I will definitely be buying these for my friends if I get them LEDs as well.
AA –
Very difficult to line up correctly. The only way to line them up correctly is with the power on. If the power isn’t on you will be randomly trying to much disappointment. So I turned the power on, and flipped this clip upside down so the connections will touch. The thought that you could slide these under the little connectors is ridiculous. Giving it 4 stars because of the pain in rear to get it to “line up” perfectly. Installation isn’t easy as others made it seem. BUT it works.
Tiffany G (: –
Came in a pack of 10. The easiest way to open is to get a screw driver in the middle and wedge it like a crow bar. Pull up till it pops open. You take the cut ends and slide them under the 4 little metal bars which connect them. Make sure the leds are placed right and not flipped the wrong way or it wont work. Only reason I gave 4 stars is because the first one I tried didn’t work and the 2nd I took out was broken.
Mike –
Easy to open and put up, only bad thing was the LED strips were difficult to make contact with the copper connectors in the cliOS. This was the 1st time I installed them so it may become easier the more you do it
Roberto coronado medina –
Great product
James –
I used this to repair lights already mounted. I agree with others, it took me a few minutes to connect the two ends but they do work. I ended up not cutting right on the line of the LED segment leaving more of the copper exposed. I felt this helped having more of the copper to use for contact.
I’ll Fix It For You, Inc. –
This product was exactly how it was described.