


New


Original price was: $19.90.$13.93Current price is: $13.93.
- fast shipping
- Safe Payments, Secure Personal Information
- Nature-friendly materials, 100%.
- 7 days free returns

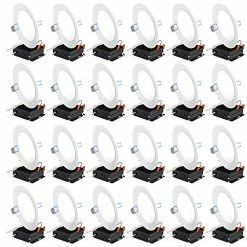
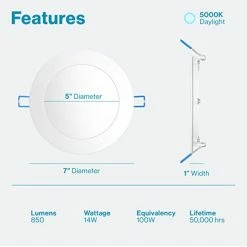
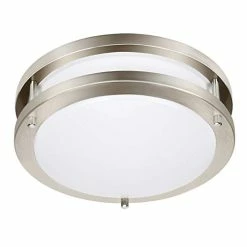
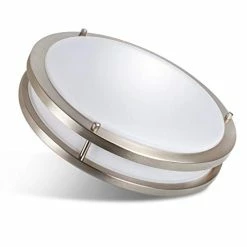
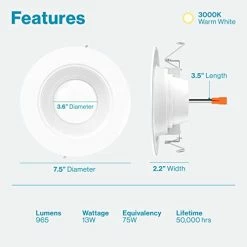
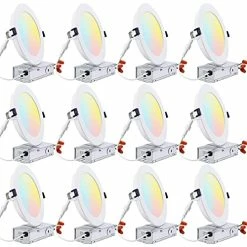
- Color: Finished White
- Brand: Westinghouse Lighting
- Indoor/Outdoor Usage: Indoor
- Special Feature: adjustable, energy_efficient
- Light Source Type: LED
- Power Source: Corded Electric
- Light Color: White
- Theme: Medallion
- Style: Traditional
- Material: Metal
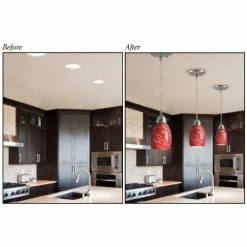
- Unique patented design enables you to transform existing recessed lighting into a pendant or other light fixture. They are easy to use
- Adjusts to fit any recessed can size between 4-inch and 6-inch. They are highly durable
- Decorative medallion can be painted to match any décor. Manufactured in China
- Features medium base adapter which fits many existing recessed cans
- 50 pound maximum load rating includes mounting hardware
8 reviews for New 👍 0101100 Recessed Light Converter, 1, Finished 🎉
Add a review
Related products
New
Original price was: $45.99.$32.19Current price is: $32.19.
New

Original price was: $29.99.$20.99Current price is: $20.99.
New
Original price was: $132.74.$82.00Current price is: $82.00.
New
Original price was: $29.99.$20.99Current price is: $20.99.
New

Original price was: $119.19.$81.00Current price is: $81.00.
New
Original price was: $23.99.$16.79Current price is: $16.79.
New

Original price was: $14.99.$10.49Current price is: $10.49.
New
Original price was: $99.99.$83.00Current price is: $83.00.
MPH in Texas –
This can light converter works and is far less expensive than others I’ve seen on Amazon. It makes converting a can light to a pendant or chandelier easy.A couple notes on installation – you have to drill 2 self tapping screws into the existing can light outer wall to secure the new bracket that will hold the new light fixture. It’s very sturdy once it’s done but screwing it into the metal is challenging. I put the bracket where I wanted it and used a Sharpie to mark where I wanted the first screw to go. I then took a large nail and used it as a starter punch by hammering a dent into the mark. The dent made it so the screw didn’t “walk” when I was trying to get it started. Even with that, I had to push hard on the drill and keep it going for about 20 seconds or so until the screw bit enough to go through the can. I did the same thing for the 2nd screw but didn’t have to make a mark since I just put the nail in the middle of the screw hole on the opposite side of the bracket. You might have better luck with an actual metal punch.On sizing and centering the bracket, I did that before I drilled, but I assume you could do it after.The ceiling medallion/cover is fine but you might want to spray paint it since it’s a shiny plastic white. I bought 2 aged bronze pendant lights with glass shades and used a couple of light coats of Rustoleum Universal to paint the top and bottom parts of the light fixture matte black. I used the same paint for the medallion and it all matches. If you want the medallion white to match your ceiling, depending on the color of your ceiling you still might consider spray painting it a matte or hammered white to cut down on the shiny white plastic look.The medallion is plenty wide enough to cover a 6 inch can light opening.Yes, I know the top of the fixture is not entirely centered in the medallion. I’ll fix it, I swear. And ignore the popcorn ceiling, which remains the bane of my existence.
beebop –
The important thing is, it worked.Now the deficiencies… 1) I needed to fuss around with the position of the pieces to avoid gaps from showing. 2) beware of the plastic looking molding ring. You may want to paint it. 3) this is not directly related to the kit, but you would probably encounter it. The canister housing I was working with has two layers. It turned out trying to drill through them was more involved than I thought. It was much tougher to drill through two layer of metal that can shift relative to each other. That means the drill bit was getting cut by the first layer as I was drilling through the second layer. One bit broke and was stuck in the material. I had to hammer it in to avoid the drill bit stub from cutting someone working on it in the future. I ended up breaking 3 or my drill bits before I managed to install two of these kits.
dave Yates –
I am a female who wanted to swap out my outdoor can light for a chandelier. I am not handy but can follow directions. Westinghouse made this product easy to use, thorough/understandable directions and made this project very easy. Would highly recommend. Like others have suggested, make a mark in the can light in order to prevent the screw from slipping. It was all surprisingly easy!
Jonathan J. –
Very sturdy and a good value for the price. Was a pain to install mounting screws into 4 inch cans, had to drill pilot holes and even that was a pain with a standard cordless drill. I am sure it is easier in a 6 inch can. You’re best bet in any size is to drill pilot holes first. Pulled down on bracket to the point the cans were being pulled down so it can hold the weight of a light fixture. Only wish they included a white flat plate along with the medallion for options to cover the can light hole.
Freya Benson –
We wanted to convert a can light to a chandelier and this kit did the trick. Could have better instructs but we found a Westinghouse YouTube video that helped. Love it! I’m getting two more for the hallway.
Tee –
This converter worked well for me, with a couple tweaks. First, I live in an older home with heavier-gauge metal can lights. Instead of fighting to drill in the self-tapping screws on their own. I used a Spyder drill bit (available at any big box store) to pre-drill the holes for the bracket. Then, I used a hex driver to get the screws in, because it was difficult to do it with a Philips bit without stripping them. Next, my box presented a problem: the builders did not install my cans flush with the ceiling drywall and they were about 1.5” higher. Ugh. So I had to get creative and use Loctite Powergrab adhesive to stick the metal plate to the ceiling. Then I used longer screws to attach the bar for mounting the light. After that it worked out great.
Myles Robles –
Half the price at lowes, saved me from calling an electrician
Brendan Mayo –
The product does what it’s suppose to do but quality control of product needs some help. My biggest issue is the so called self tapping screws that go into the metal can to hold the bracket. These screws are a joke so have a small drill bit available or your own self tapping screws. These are Junk! There are a couple other issues but for me, these screws made the job harder then it should have been.